ShopDreamUp AI ArtDreamUp
Deviation Actions


![City On Night Tutorial [Paint Tool SAI]](https://images-wixmp-ed30a86b8c4ca887773594c2.wixmp.com/f/01181449-cc43-4889-afa1-2facf50cb768/d6tphwz-13aba244-0443-4850-915b-43aff387ae11.jpg/v1/crop/w_184,h_184,x_0,y_521,scl_0.14024390243902,q_70,strp/city_on_night_tutorial__paint_tool_sai__by_riki_to_d6tphwz-92s-2x.jpg?token=eyJ0eXAiOiJKV1QiLCJhbGciOiJIUzI1NiJ9.eyJzdWIiOiJ1cm46YXBwOjdlMGQxODg5ODIyNjQzNzNhNWYwZDQxNWVhMGQyNmUwIiwiaXNzIjoidXJuOmFwcDo3ZTBkMTg4OTgyMjY0MzczYTVmMGQ0MTVlYTBkMjZlMCIsIm9iaiI6W1t7ImhlaWdodCI6Ijw9MTI2MTciLCJwYXRoIjoiXC9mXC8wMTE4MTQ0OS1jYzQzLTQ4ODktYWZhMS0yZmFjZjUwY2I3NjhcL2Q2dHBod3otMTNhYmEyNDQtMDQ0My00ODUwLTkxNWItNDNhZmYzODdhZTExLmpwZyIsIndpZHRoIjoiPD0xMDI0In1dXSwiYXVkIjpbInVybjpzZXJ2aWNlOmltYWdlLm9wZXJhdGlvbnMiXX0.ocL4lK0WCEeJuZMY1Kf2_lb-eXcf6docuzC_Y_cQ3kg)
![City On Night Tutorial [Paint Tool SAI]](https://images-wixmp-ed30a86b8c4ca887773594c2.wixmp.com/f/01181449-cc43-4889-afa1-2facf50cb768/d6tphwz-13aba244-0443-4850-915b-43aff387ae11.jpg/v1/crop/w_92,h_92,x_0,y_260,scl_0.070121951219512,q_70,strp/city_on_night_tutorial__paint_tool_sai__by_riki_to_d6tphwz-92s.jpg?token=eyJ0eXAiOiJKV1QiLCJhbGciOiJIUzI1NiJ9.eyJzdWIiOiJ1cm46YXBwOjdlMGQxODg5ODIyNjQzNzNhNWYwZDQxNWVhMGQyNmUwIiwiaXNzIjoidXJuOmFwcDo3ZTBkMTg4OTgyMjY0MzczYTVmMGQ0MTVlYTBkMjZlMCIsIm9iaiI6W1t7ImhlaWdodCI6Ijw9MTI2MTciLCJwYXRoIjoiXC9mXC8wMTE4MTQ0OS1jYzQzLTQ4ODktYWZhMS0yZmFjZjUwY2I3NjhcL2Q2dHBod3otMTNhYmEyNDQtMDQ0My00ODUwLTkxNWItNDNhZmYzODdhZTExLmpwZyIsIndpZHRoIjoiPD0xMDI0In1dXSwiYXVkIjpbInVybjpzZXJ2aWNlOmltYWdlLm9wZXJhdGlvbnMiXX0.ocL4lK0WCEeJuZMY1Kf2_lb-eXcf6docuzC_Y_cQ3kg)


Description
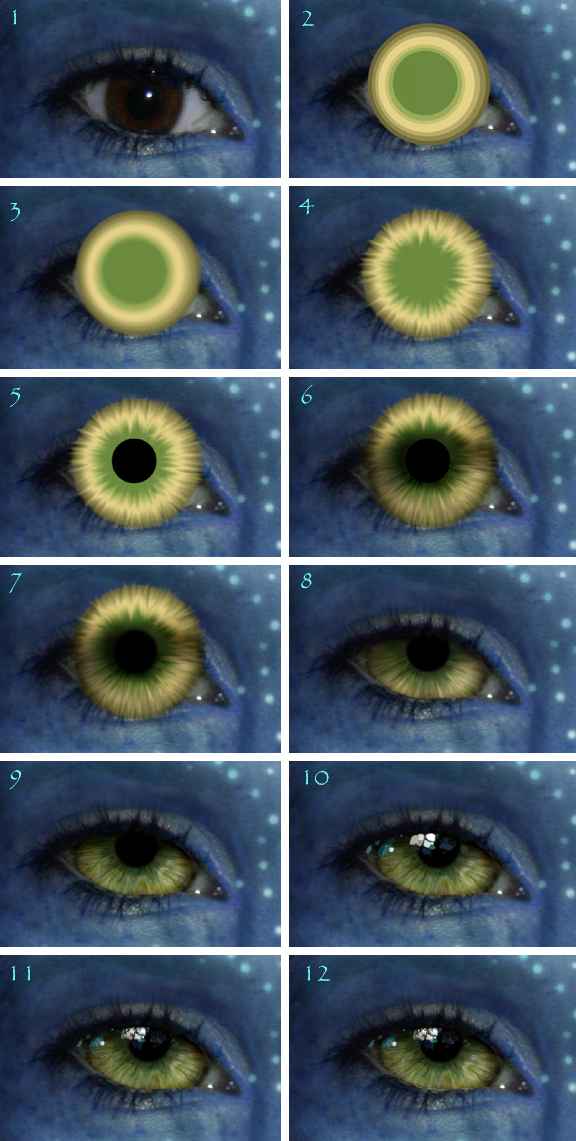
Well I have had a few requests to make a tutorial on how to draw a realistic iris, and it just so happens that I am in the middle of making my sister into a Na’vi, so I have turned the making of her iris into a little tutorial. This is my first tutorial, so please give me feedback on how I can improve it and make it more comprehensive! Hope it helps! 
(I would be really interested to see anything that this tutorial inspires you to draw! Please do note me and I would love to have a look. Thanks!)
>Just for your interest, here [link] is a close-up of the finished eyes and here [link] is the finished overall picture

1. Well, first you start off with your plain eye - I have tweaked the height and width of it a bit, but I forgot to save that as I went along, so I have no layers to show you, sorry!
2. Use the eyedropper tool to pick colours from the photo you are copying. Then set your brush tool to hardness 100% and set the diameter so that it is the size that you want the overall iris to be. Now just click once to create a big circular block of the base colour. Continue picking colours and varying the diameter of the brush so that the concentric circles get smaller and smaller.
3. Take the blur tool and just blur all the circles in together, so there aren’t any sharp lines. They all need to be on the same layer for this to work.
4. Set the smudge tool to a very small diameter, and basically draw lots of little straight lines radiating out from the centre of the circle.
5. Create a new layer and use the brush tool to add a big completely black pupil. The reason this is on a separate layer is because you will need to do lots of blending and burning and dodging later on, and you don’t want to mess up the pupil.
6. Take the burn tool and darken the iris a bit. Notice how I have burnt a dark line almost horizontally across the iris - this is because the top eyelid casts a shadow onto the iris. Also use the dodge tool to lighten some parts of the iris, alternating between the different ranges: shadows, midtones and highlights.
7. All I have done in this step is to blur the outline of the pupil a little bit, because the very crisp line looks too computerized. Don’t blur it too much, because it still needs to look defined from the iris.
8. Use the eraser tool to delete the bits of iris which are poking over the eyelids. I do this by reducing the opacity of the layer to about 50% so that I can see the outline of the eyelids through the layer of the iris. This makes it easy to know which bits to delete.
9. Set the brush tool to a diameter of about 1px and draw on the detail of the iris, with little lines radiating out from the pupil. These aren’t always completely straight, so don’t worry if they are a bit wobbly. Set the burn and dodge tools to about 1px and draw more lines - add any little highlights and shadows that are created by the texture of the iris. Also use the burn tool to darken the edges of the iris to make it look realistic.
10. On a new layer, use the eyedropper tool to pick out the colours of the reflections and then set the brush tool to quite a low diameter and block in the basic colours.
11. Set the eraser to a diameter of about 2px and start neatening up the reflections. Remember that there will be shadows from the eyelashes, so just draw flicky lines with the eraser and it will look like eyelash shadow.
12. This step is very subtle, and basically you just use the brush to draw a little bit of whiteish colour along the rim of bottom eyelid, because this is moist and light reflects off it a little.
(I would be really interested to see anything that this tutorial inspires you to draw! Please do note me and I would love to have a look. Thanks!)
>Just for your interest, here [link] is a close-up of the finished eyes and here [link] is the finished overall picture
1. Well, first you start off with your plain eye - I have tweaked the height and width of it a bit, but I forgot to save that as I went along, so I have no layers to show you, sorry!
2. Use the eyedropper tool to pick colours from the photo you are copying. Then set your brush tool to hardness 100% and set the diameter so that it is the size that you want the overall iris to be. Now just click once to create a big circular block of the base colour. Continue picking colours and varying the diameter of the brush so that the concentric circles get smaller and smaller.
3. Take the blur tool and just blur all the circles in together, so there aren’t any sharp lines. They all need to be on the same layer for this to work.
4. Set the smudge tool to a very small diameter, and basically draw lots of little straight lines radiating out from the centre of the circle.
5. Create a new layer and use the brush tool to add a big completely black pupil. The reason this is on a separate layer is because you will need to do lots of blending and burning and dodging later on, and you don’t want to mess up the pupil.
6. Take the burn tool and darken the iris a bit. Notice how I have burnt a dark line almost horizontally across the iris - this is because the top eyelid casts a shadow onto the iris. Also use the dodge tool to lighten some parts of the iris, alternating between the different ranges: shadows, midtones and highlights.
7. All I have done in this step is to blur the outline of the pupil a little bit, because the very crisp line looks too computerized. Don’t blur it too much, because it still needs to look defined from the iris.
8. Use the eraser tool to delete the bits of iris which are poking over the eyelids. I do this by reducing the opacity of the layer to about 50% so that I can see the outline of the eyelids through the layer of the iris. This makes it easy to know which bits to delete.
9. Set the brush tool to a diameter of about 1px and draw on the detail of the iris, with little lines radiating out from the pupil. These aren’t always completely straight, so don’t worry if they are a bit wobbly. Set the burn and dodge tools to about 1px and draw more lines - add any little highlights and shadows that are created by the texture of the iris. Also use the burn tool to darken the edges of the iris to make it look realistic.
10. On a new layer, use the eyedropper tool to pick out the colours of the reflections and then set the brush tool to quite a low diameter and block in the basic colours.
11. Set the eraser to a diameter of about 2px and start neatening up the reflections. Remember that there will be shadows from the eyelashes, so just draw flicky lines with the eraser and it will look like eyelash shadow.
12. This step is very subtle, and basically you just use the brush to draw a little bit of whiteish colour along the rim of bottom eyelid, because this is moist and light reflects off it a little.
Image size
576x1141px 609.6 KB
© 2010 - 2024 Temawei
Comments131
Join the community to add your comment. Already a deviant? Log In
Awesome, I'm going to try right away. Thanks a lot!![]()